How to make a Robot – A Beginner-friendly Step-by-Step guide

How to make a robot at home? Sayaani asked. And before Mansi could answer, another question came from Vatsal: How to make a robot which I can use as a school project?
Mansi had to answer both the questions now, and the answers were actually the same. Let’s learn to build a beginner friendly DIY robot that can be modified to do multiple things and can be presented as school science projects too.
What is a Robot?
In the simplest definition for kids, a robot is a machine that does at least some task by itself. That means it has some level of autonomy.
Let’s understand this with an example.
A washing machine that starts and stops as per the set timer is just a machine. But what if the machine can feel the cloth types and decide how much time they should rinse them? Then it’s a robot! They have a level of autonomy here.
A drone that flies as per the commands given through a remote control or app is a normal machine. But if they can sense the fire and trigger the extinguisher, they are robots.
Activity: Find 2 more examples of a normal machine that can be turned into a robot, and explain how.
Does a robot need to look like a human?
If we go back to the same example, a washing machine does not look human and still it can have plenty of intelligence and motor capacity to do its job efficiently. A driverless car is off-course a robot, but it looks like a car, not a human. So, no, a robot need not look like a human.
Many times school children ask us, “I want to make a real robot for a science exhibition, can I build using Havi Elements?”. And we understand immediately that by real robot they mean a robot that looks like a human.
But young creators, every robot is a real robot. 🙂 To answer your question, yes, you can construct real robots with Havi Elements. And by real we mean a machine that has some level of autonomy or smartness, including the one looking like a human.
So the shape of a robot depends on its purpose. It can look like a human, an animal, a bird, an insect or it can be just a box, or even without an outer body. A robot that looks like a human is called a humanoid and it’s a fascination of humans to make robots that look like humans. In-fact nature is full of diverse creatures and mimicking them is always exciting.
Does a robot have AI?
Not necessarily. AI means Artificial Intelligence, that’s the ability to learn from experiences. If a washing machine starts washing woolen clothes in a better way with the feedback of every single wash, we call it AI Robot. AI is all software and data, it has nothing to do with machine or physical form.
Siri is AI, but not a robot.
Can a kid make a robot?
Yes, kids can make easy robots that not only help them understand technology but also build their creative and STEAM skills.
What do I need to do to build a robot?
Robots have 3 things.
The body – that’s mechanics + craft. Mechanics is the motion and it’s not always required that a robot will have a motion. For example a basketball hoop that alarms when you make a goal, is a simple robot, but it doesn’t need motion.
The craft is to give beauty and usefulness to your robot. The body can be made with easy household items like cardboard, construction papers, and be prepared with advanced materials like metal plates and 3D printed objects.
The electronics – that’s in nutshell the flow of current. Havi Elements takes care of electronics.
The Program – your robot may or may not require a program. For example the smart basketball hoop, if we want to add a feature of counting the goals and display them on a screen we need to program the elements. To make programmable robots, you need Havi Controller. You can program the Havi controller with python.
So you need Havi Elements – robotics starter kit and Havi Elements – advanced kit add-on to make a variety of beginner friendly robots. Let’s start building.
Step by Step guide to make robot
Let’s get it into shape first. We will build a robot having 2 wheels and a roller that will efficiently support the motion. You can build a basic, easy robot car using Havi DIY Robotics Starter Kit and further add several functions to it. Here we are preparing a most basic robotic structure that moves in forward direction, reverse direction and circles around. You can change this robot to a line follower robot, cliff avoiding robot, obstacle avoider robot and several others by changing Havi Elements circuit and further programming the same.
So let’s start making a DIY robot with step by step instructions, pictures and video!
Things you need to make simple robot car
Elements:
Power – 1
Motor – 2
Accessories:
Car plate
Wheels – 2
Roller – 1
Geared motors – 2
Double sided tape
To get these elements & accessories exclusively for making DIY robotic car, contact us.
The making
Step 1
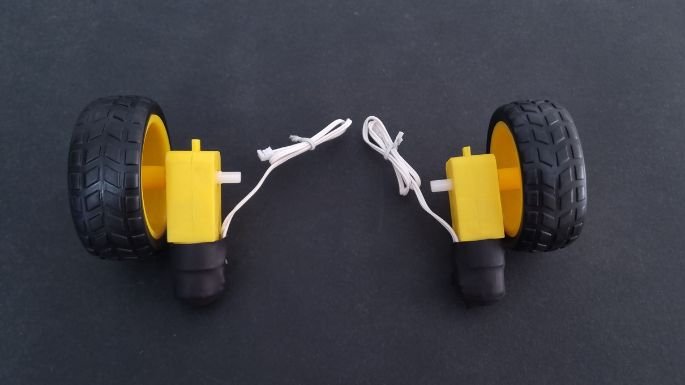
Hold a wheel into your left hand and a geared motor in the right hand. Keep the motor in a way so the black head points opposite to you and the motor wire faces your right palm.
Push the motor shaft into the shaft slot of the wheel. You will have to match the flat and curved surfaces of the shaft and the slot.
Similarly, do this for the other wheel.
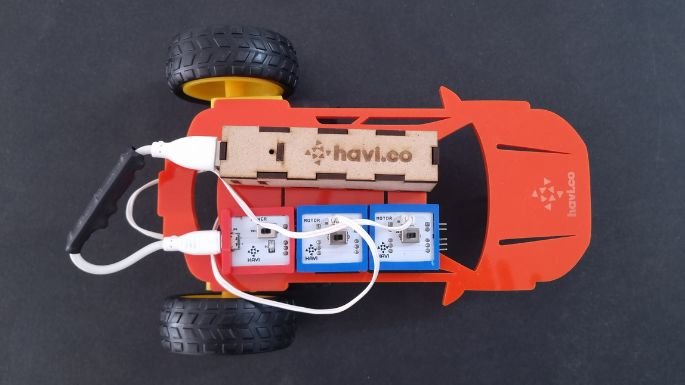
The place where you see Havi.co’s logo is the top front portion of the car chassis. You need to start working on the opposite side, i.e. the bottom.

Stick a piece of double sided tape on the motor. Match with the motor slot at the car plate bottom. Stick the geared motor on the car plate.
Similarly for the second motor.


Stick two small pieces of the tape at the bottom of the roller and stick that below Havi.co’s logo on the car plate.

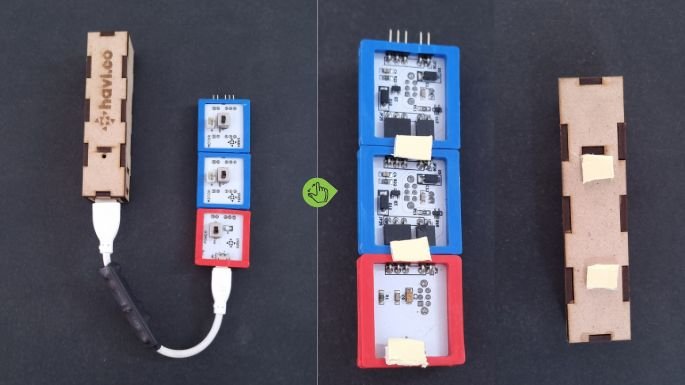
Prepare the circuit of Power-Motor-Motor and connect it with the powerbank using USB cable. Stick the entire circuit setup with the car chassis using DST.
Connect the motor cables with the motor element.
Your robot car is ready to go. Turn the power on and it will zoom on the floor.
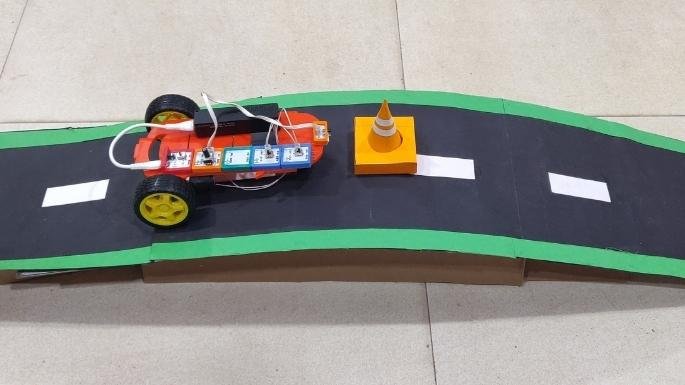
More robust method for making a robot car for long term – Optional
If you plan not to disassemble your robot soon after playing and want to build more features, you can use thin wire ties to tighten the motors and the roller.
This is an optional step though. You can also completely avoid using DST and rely only on wire ties . But know that wire ties are of one time use only. For easy and faster assembly and disassembly, use DST.
Checkout the following image & video to make a robot car for school projects – wire ties version.

How does this robot car work?
The power element does supply the current to motor elements. The motor elements supply the current to geared motors which will rotate the connected wheels.
Wheels will rotate together to force the car to move. The roller will reduce the friction and will help the car to move smoothly.
This is the fundamental principle behind an electric car. Kids can submit this robot car project to school and science fairs. Contact us to get the customized pack for making robotic car.
So now we know how to make an simple robotic car at home or at school. But we can add several advanced robotic car features to this simple robot car. All of these features are easy to build with havi elements, fun to play at home, great to teach and learn robotics, and best ideas to submit as school projects. Click on the associated links and make them one by one.
1. Circle drawing car
No change in circuit. Adjust the motor switch in such a way that one wheel moves in forward direction while another wheel moves in backward direction. At the front-side, stick a marker pen in such a way that the pen points to the ground. Turn the power ON and wonder about the exact circle drawn by the robot car.
Teachers can check out the circumference activities to teach kids circle concepts using robot car.
2. Smart robot car with IR sensor
Use an IR sensor with the circuit to make the robot car behave smartly. Find out the numerous applications. This can be a very good activity for robotics summer camps. Here are a few examples.
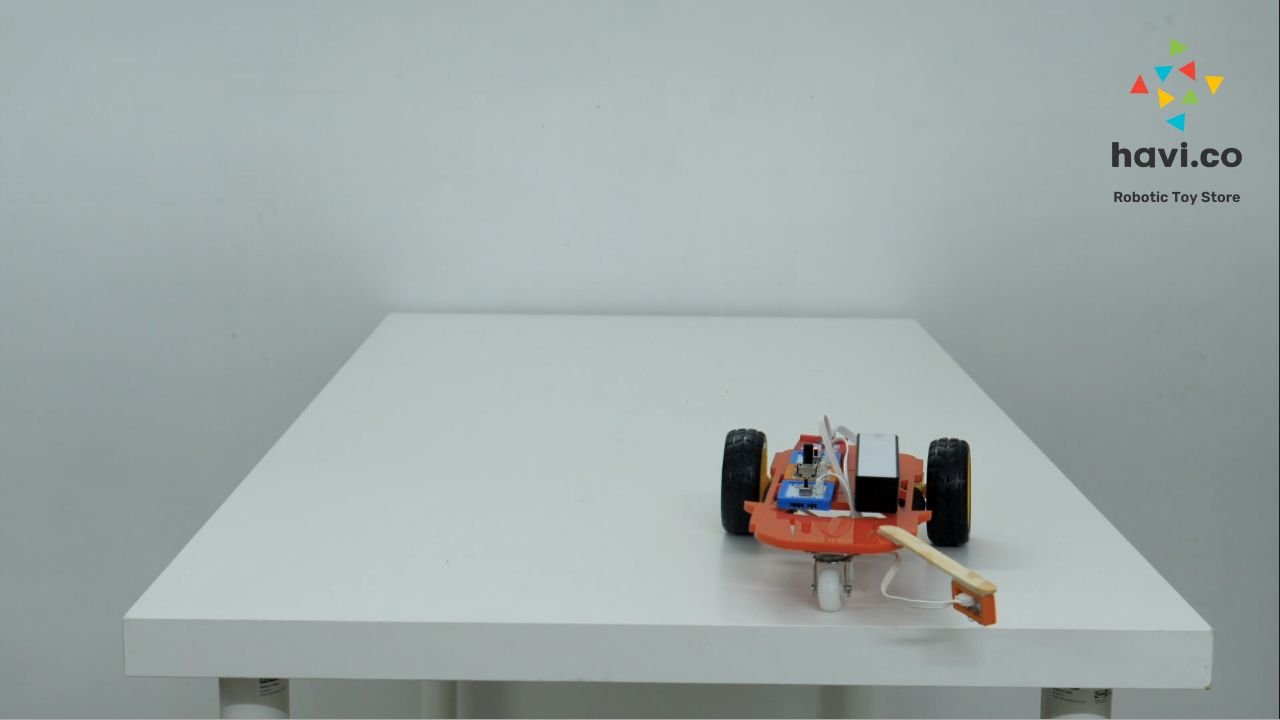
2.1 Human following robot car
Change the circuit to Power + IR + Motor + Motor. Adjust the motor switch in such a way that the car should move in forward direction.
Use an ice-cream stick to maintain distance. This way you can make the follow me robot car.
2.2 Touch me not robot car
Keep the circuit similar to the previous robot car. Change the placement of the ice-cream stick & make the car that will not let you or anyone touch it.!
2.3 Remote controlled car
Everyone’s most favorite remote-controlled robot car is here. Check how IR sensor works with remote control & make the very easy RC car.
3. Obstacle avoiding robot car
Make obstacle avoiding robot car by tweaking the circuit a bit. There are two variation of this car:
3.1 Obstacle avoiding car that stops at obstacle
3.2 Obstacle avoiding car that turns at obstacle
Check step-by-step making and working videos of obstacle avoiding robot car.
4. Reverse car parking sensor smart robot car
Wonder what to build in your next science fair? Here is an easy school project. Make a reverse car parking sensor smart robot car that stops when backside wall is near and also generates an alert sound.
5. Front accident avoider robot car
Similar to the previous project, we can change the direction of robot car from backward to forward and that way, we can make a front accident avoider smart car.
6. Automatic brake lights robot car
What happens in real cars when we push the brakes? The car will stop and at back side the red lights start. We can make an automatic brake lights robot car. When an obstacle comes, the car will stop and at the backside, the red lights turn on.
7. Edge avoiding robot
Make an edge avoiding robot car that takes turns when the edge comes. The smart car that is beneficial for accident prevention systems.
Get the step-by-step instructions of making: How to make an edge avoiding robot
8. Line following robot car
The car that follows black line. Check out numerous project ideas and step-by-step instructions for making line following robot here.
9. Spiral car – Robot car that comes out of chakravyuh
You can make a smart robot car that comes out of a spiral – a chakravyuh. Use the blocks to make a spiral shape and try your robot car within that.
10. Automatic headlight control robot car
The automatic headlight control robot car works with light sensor. When the car passes through dark or when it is night, the headlights will be automatically turn on and the headlights will be turned off if it is daylight.
So now we know how to make an easy robot at home or at school. Further you can give the next level of shapes and usability to any of these robots and present them as science fair projects and school projects. For example you can create a craft for restaurant servers and place it on an online follower robot to make an autonomous robot that serves at restaurants.
You can get all these in Havi Elements Robotics Starter Kit or can contact us to get a customized pack to make any of the above robots.