Reverse Car Parking Sensor Project using Havi Elements


Aane de… Aane de…. Aane de……
You must have seen as well as been in this situation. Someone is driving the car in reverse and Dadaji or Buaji is guiding them, especially while parking a car in reverse.
But you might have also observed one or many of the following features in a car.
- A car that beeps or plays a tune while driving in reverse to keep the driver alert.
- A car that beeps when an obstacle, like a wall, is approaching.
- The rear of the car displayed on the media screen, along with drawings showing the car’s coverage, allowing you to see if something is in the car’s path.
- A car that stops by itself if it is about to approach a wall or a pole.
Cars have become smarter and smarter with these advanced features, reducing the need for someone to guide you with “Aane de….” and increasing the overall safety of the vehicle and its occupants.
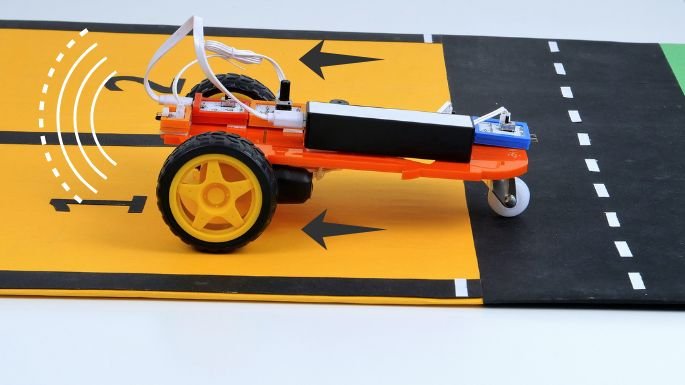
Now, let’s build a working model of a reverse car parking sensor project using Havi elements and also understand how this system works.
What is reverse parking sensor
Reverse car parking sensors are tiny electronic devices that can be placed at the rear bumper of a car. They measure the distance between the rear bumper and the object in front of it.
If the minimum safety distance is breached, the sensor activates safety measures, which can be a beep, a tune, or a brake, in the case of smart cars.
Which sensor is used in reverse car parking?
IR sensor, Ultrasonic sensors, motion detectors and cameras can be used as reverse car parking sensors. Each of them do have different features and purposes.
We will use IR sensors to build our reverse car parking sensor project.
What is the objective of a car parking sensor?
The top most objective of a car parking sensor is to prevent the damage or loss of vehicle, properties and lives of humans.
Making of car parking sensor project
What will you need?
Elements:
Power – 1
IR pair(IR controller & IR LED with 3 pin cable) – 1
Motor – 2
Flip – 1
Buzzer – 1
Accessories:
Power bank with USB cable
Geared motors – 2
Roller – 1
Car plate
Craft material:
Ice cream stick
Double sided tape
Contact us to get the customized pack to make this project.
You can find all these components in the Havi – DIY Robotics Starter Kit. Purchase this kit and create a reverse car parking sensor along with 100 other projects.
Alternatively, you can also find these components in the Havi – DIY Robotic Car Kit, which allows you to build 41 DIY projects.
The making
Step: 1 Building a car
Let’s begin the creation process by building the car first. You can refer to the instructions on “How to make a DIY robotic car using Havi elements” to learn how to construct the car structure.
You can please refer to the following video too.
You can please refer How to build a robot car if you are making your reverse car parking sensor project using Havi Elements – DIY Robotic Car Kit
Step 2
Version 1: Alarm system
First, let’s create a basic reverse parking alarm system that activates the alarm when the car comes closer to a wall or any other object.
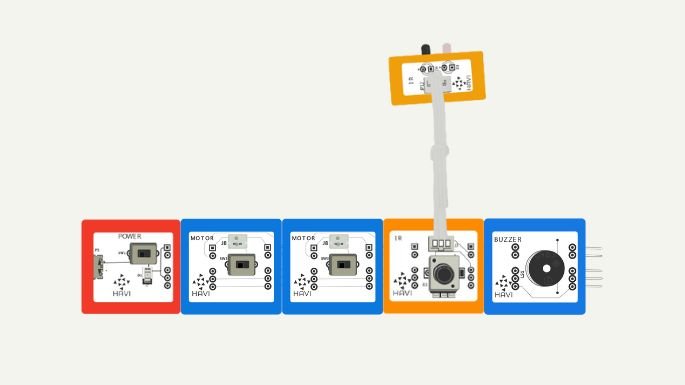
Prepare the reverse car parking sensor circuit as follows:

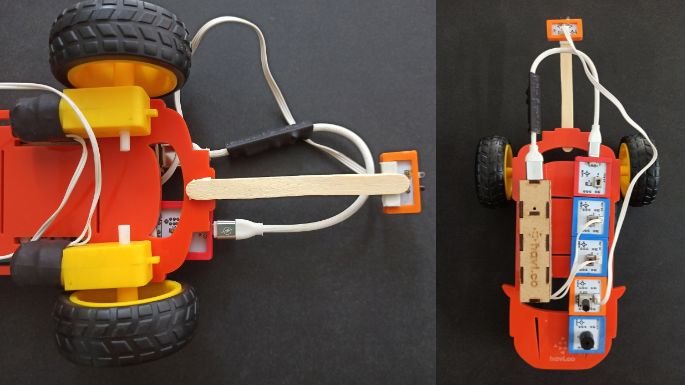
- Attach a piece of double-sided tape (DST) at the bottom rear side of the car plate.
- Stick one edge of the ice cream stick on that piece of DST.
- Connect the circuit to a power bank.
- Place and attach the circuit and power bank over the car plate using DST.
- Connect the geared motors with the motor elements.
- Connect the IR LED and IR controller using a 3-pin cable.
- Stick the IR LED on the other edge of the ice cream stick.

Adjust the motor switches so that both motors rotate in the backward direction.
Now, our reverse car parking sensor project with an alarm is ready. Turn the power ON, and the car will start moving backward. As the car approaches the wall, the buzzer will sound, serving as an alarm to alert the driver about the approaching obstacle. However, in our case, the car will remain uncontrolled and may hit the wall.

What if we want to create a smart car that stops automatically when approaching a wall? Then we can call it a robot car as well!
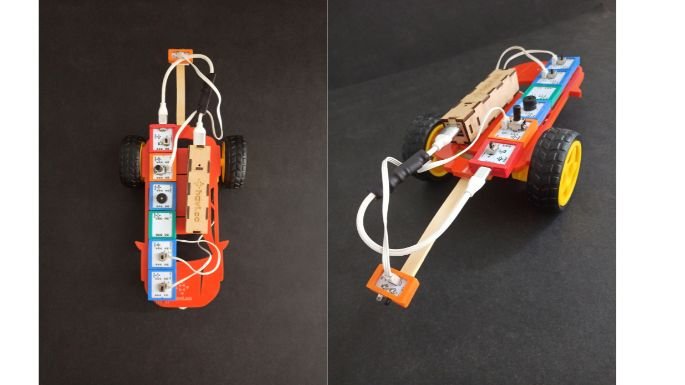
Let’s now prepare a smart reverse parking sensor project in which the car will stop by itself and activate the buzzer. However, if you want to eliminate the buzzer, you can do so.
Modify the circuit as shown here.


How do car parking sensors work?
Do you know how the IR sensor works?
Version 1: The alarm
In the first case, the IR sensor will detect an object and send a “Yes” signal to the buzzer. Buzzer will turn on and will make the sound. However motors are not under control of the IR element hence will continue working normally.
Version 2: The smart stop
In the second case, We bring motors under the control of IR+Flip and the buzzer under control of IR.
When there is no object in the way, the IR sensor will release a “No” signal to the buzzer. The buzzer will remain off and forward the “No” signal further to Flip. Flip will receive the “No” signal, flip it to the opposite (“Yes”), and pass it to the motors. As a result, the motors will remain on.
However, when the IR element detects an obstacle, it will send a “Yes” signal to the buzzer. The buzzer will turn on and pass the signal to Flip. Flip will invert the signal to “No” and transmit it to the motor elements. This will make the motor elements stop, causing the car to come to a halt.
That’s a smart reverse mechanism using an IR sensor.
What are the benefits of reverse parking sensors?
The alarm mechanism alerts the driver for the upcoming obstacle while the smart reverse sensor delivers much more. That prevents accidents to happen as it stops the car by itself.
School students can prepare some impressive craftwork and present this project in their school science fairs. Check out the example below.

Think, play, and learn….till we come back with a new post.
