12 beginner friendly LED Projects with Microcontroller


When Vaikunth triggered the question on the static traffic light model, Nancy introduced them to microcontrollers and helped with what a microcontroller is.
Here in this blog we are presenting 12 cool, fun and beginner friendly LED projects you can do with a microcontroller. Yes, yes, it includes a traffic signal model too.
Let’s begin the creation journey!
What do you need to make LED projects with microcontrollers?
- Havi Controller (a microcontroller, more powerful then arduino, can be programmed with python and C++)
- LED Elements
- LED cables
- Power bank with USB cable
- Havi bricks (to setup the structure)
- A laptop or desktop to write and load the program to microcontroller
- Microcontroller data cable
All these components (except laptop) are part of Havi Elements – DIY Robotics Starter Kit and Havi Advanced kit add-on. However you can contact us to get just the required components to make the projects.
LED Microcontroller Project 1
Turn the LED ON
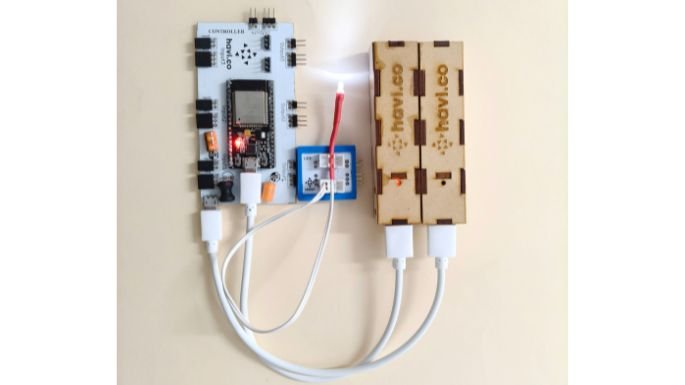
This is the most basic program you can do with an LED and a microcontroller. Turn the LED on.
The circuit
The code
import time
led1 = ports.output1()
led1.value(1)
LED Microcontroller Project 2
Turn the LEDs ON and OFF one by one
The circuit

The code
import timeled1 = ports.output1()
led2 = ports.output2()while True:
led1.value(1)
led2.value(0)
time.sleep(1)
led1.value(0)
led2.value(1)
time.sleep(1)
The output
LED Microcontroller Project 3
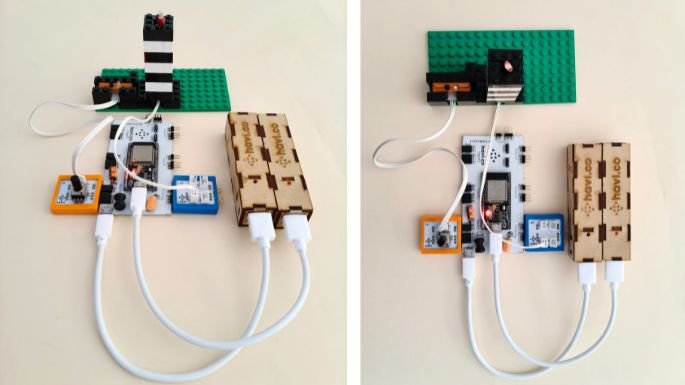
Turn the LED on and off based on object detection by IR element
The circuit
The code
import timeir_input = ports.input1(‘ir’)
led1 = ports.output1()
led1.value(0)while True:
if ir_input.value() == 1:
led1.value(1)
else:
led1.value(0)
The output
LED Microcontroller project 4
Blink the LED
The circuit
The code
There are four variation of blinking the LED project.
1. Blink the LEDs with time gape of 0.5 seconds in between the cycle
import timeled1 = ports.output1()
led2 = ports.output2()
led3 = ports.output3()
led4 = ports.output4()
leds = [led1, led2, led3, led4]delay = 0.1while True:
for led in leds:
for _ in range(4):
led.value(1)
time.sleep(delay)
led.value(0)
time.sleep(delay)
print(“_____LED ON”)
time.sleep(0.5)
2. Blink the LEDs continuously without any gap in between the cycle
import timeled1 = ports.output1()
led2 = ports.output2()
led3 = ports.output3()
led4 = ports.output4()
leds = [led1, led2, led3, led4]delay = 0.05while True:
for led in leds:
for _ in range(4):
led.value(1)
time.sleep(delay)
led.value(0)
time.sleep(delay)
print(“_____LED ON”)
3. For blinking the LEDs first forward & then backward order
import timeled1 = ports.output1()
led2 = ports.output2()
led3 = ports.output3()
led4 = ports.output4()
leds = [led1, led2, led3, led4]delay = 0.05while True:
for led in leds:
for _ in range(4):
led.value(1)
time.sleep(delay)
led.value(0)
time.sleep(delay)
print(“_____LED ON”)for led in reversed(leds):
for _ in range(4):
led.value(1)
time.sleep(delay)
led.value(0)
time.sleep(delay)
print(“ON LED_____”)
The output
5. LED Microcontroller project 5
Blink the LED when object detected by IR Element
The circuit
The code
import timeir_input = ports.input1(‘ir’)
led1 = ports.output1()
led1.value(0)while True:
if ir_input.value() == 1:
led1.value(1)
time.sleep(0.5)
led1.value(0)
time.sleep(0.5)
else:
led1.value(0)
The output
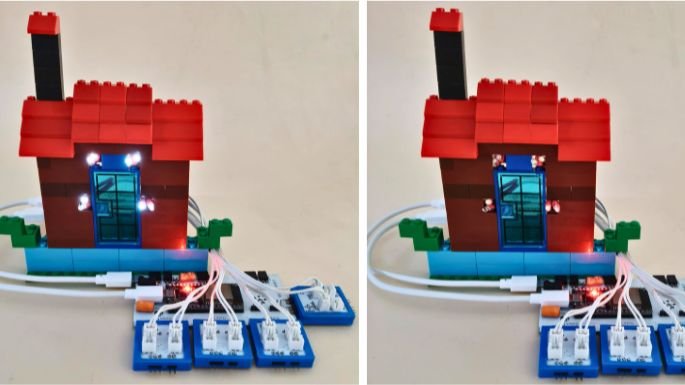
LED Microcontroller project 6
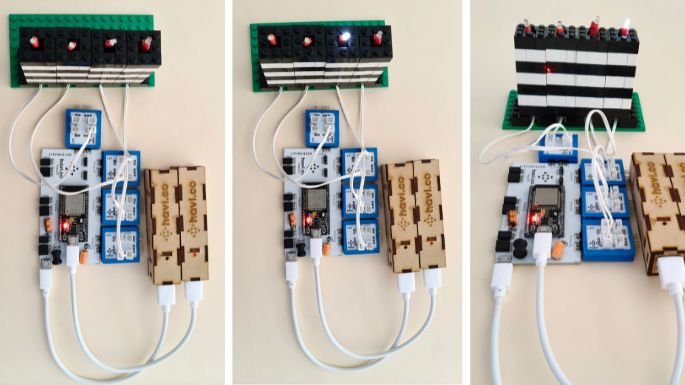
Make a traffic signal with 3 different colored LEDs
Hundreds of kids have made traffic signal with Havi Elements. Though the making process and output is very satisfying to begin with, later they want to behave the traffic signal like real. And here we do that. Connect green, red and yellow LEDs with different output ports and write the program to make them behave like an actual traffic signal.
The circuit

The code
import timered_light = ports.output1()
yellow_light = ports.output2()
green_light = ports.output3()while True:
# Green light: Go
red_light.value(0)
yellow_light.value(0)
green_light.value(1)
print(“Go!”)
time.sleep(4)# Yellow light blinking: Prepare to Stop
red_light.value(0)
green_light.value(0)
print(“Prepare to Stop – Blinking Yellow”)# Blink yellow light 3 times
for _ in range(5):
yellow_light.value(1)
time.sleep(0.5)
yellow_light.value(0)
time.sleep(0.5)# Red light: Stop
red_light.value(1)
yellow_light.value(0)
green_light.value(0)
print(“Stop”)
time.sleep(4)
The output
LED Microcontroller project 7
Make an LED based digital dice
The circuit

The code
import time
import randomir_sensor = ports.input1(‘ir’)
led = ports.output1()blink_delay = 0.3while True:
# Check if IR sensor is triggered
if ir_sensor.value() == 1:
number = random.randint(1, 6)
print(“IR Triggered – Dice Rolled:”, number)# Blink the LED ‘number’ times
for _ in range(number):
led.value(1)
time.sleep(blink_delay)
led.value(0)
time.sleep(blink_delay)# Wait until IR sensor resets (to avoid re-triggering immediately)
while ir_sensor.value() == 1:
time.sleep(0.1)# Small delay to avoid CPU overload
time.sleep(0.05)
The output
LED Microcontroller project 8
Binary number generator using LED
The circuit

The code
import time
import random# Initialize 4 digital output LEDs
led1 = ports.output1()
led2 = ports.output2()
led3 = ports.output3()
led4 = ports.output4()
leds = [led1, led2, led3, led4]while True:
# Step 1: Fast blinking — all LEDs blink quickly (e.g., 5 times)
for _ in range(5):
for led in leds:
led.value(1)
time.sleep(0.1) # LEDs ON
for led in leds:
led.value(0)
time.sleep(0.1) # LEDs OFF# Step 2: Random ON/OFF assignment
binary_state = “”
for led in leds:
state = random.choice([0, 1]) # Randomly choose ON or OFF
led.value(state)
binary_state += str(state)# Step 3: Show final binary LED state
print(“Final LED State (Binary):”, binary_state)time.sleep(2)
Can you do this project with IR? What will be the code? Try it yourself.
The output
LED Microcontroller project 9
Morse code SOS message using LED
The circuit
The code
import time# Initialize components
sensor = ports.input1(‘ir’) # You can use ‘motion sensor’ or ‘ir’
led = ports.output1() # Output LED on GPIO 17# Morse code timing
DOT = 0.2
DASH = 0.6
GAP = 0.2
LETTER_GAP = 1.0
WORD_GAP = 2.0def dot():
led.value(1)
time.sleep(DOT)
led.value(0)
time.sleep(GAP)def dash():
led.value(1)
time.sleep(DASH)
led.value(0)
time.sleep(GAP)def send_sos():
# S = …
for _ in range(3): dot()
time.sleep(LETTER_GAP)# O = —
for _ in range(3): dash()
time.sleep(LETTER_GAP)
# S = …
for _ in range(3): dot()
time.sleep(WORD_GAP)
print(“IR Sensor Activated SOS Morse Program”)
print(“Move your hand to trigger SOS message”)
while True:
if sensor.value() == 1:
print(“SOS Triggered!”)
send_sos()
# Wait for sensor to reset before triggering again
while sensor.value() == 1:
time.sleep(0.1)
time.sleep(0.05)
The output
LED Microcontroller project 10
Morse code messages using LED
The circuit & output will be almost same as the previous project. The program is generalized to transmit any message and not just SOS. Remove IR from previous code and try this project.
LED Microcontroller project 11
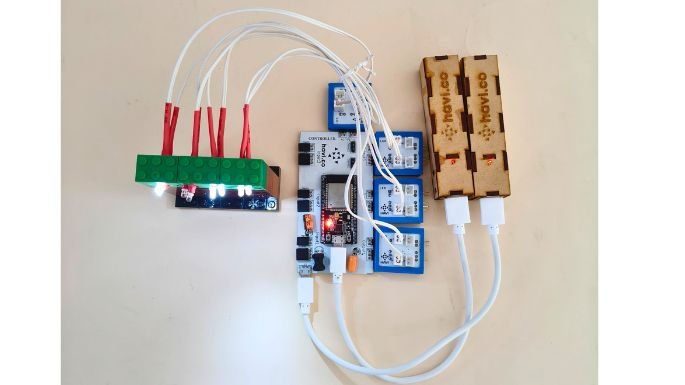
Fading the LED with an Array
The circuit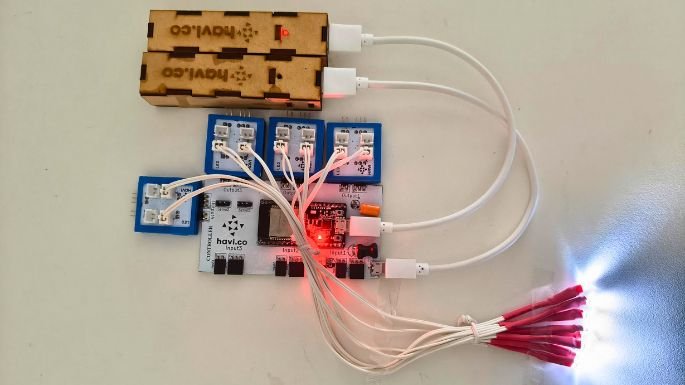
The code
import time# Initialize 4 variable PWM outputs (duty cycle from 0 to 1023)
led1 = ports.variable_output1()
led2 = ports.variable_output2()
led3 = ports.variable_output3()
led4 = ports.variable_output4()
leds = [led1, led2, led3, led4]# Fade parameters
step = 25 # How much to increase brightness each loop
delay = 0.05 # Delay between steps (seconds)while True:
# Fade in
for duty in range(0, 1024, step):
for led in leds:
led.duty(duty)
print(“Brightness:”, duty)
time.sleep(delay)#time.sleep(1) # Hold at full brightness# Fade out
for duty in range(1023, -1, -step):
for led in leds:
led.duty(duty)
print(“Brightness:”, duty)
time.sleep(delay)#time.sleep(1) # Hold off
The output
LED Microcontroller project 12
LED Fading effect with gamma correction
The circuit
The code
import time
import math# Initialize 4 variable PWM outputs (duty cycle from 0 to 1023)
leds = [
ports.variable_output1(),
ports.variable_output2(),
ports.variable_output3(),
ports.variable_output4()
]# Fade parameters
STEP = 20 # Step size for brightness (0–1023)
DELAY = 0.07 # Delay between steps in seconds
MAX_DUTY = 1023
GAMMA = 2.2 # Common gamma value for perceived brightness# Gamma correction function
def gamma_correct(duty_raw, gamma=GAMMA):
# Normalize (0–1023) → (0–1), apply gamma, then scale back to (0–1023)
normalized = duty_raw / MAX_DUTY
corrected = math.pow(normalized, gamma)
return int(corrected * MAX_DUTY)# Set all LEDs to a specific brightness
def set_all_leds(duty_raw):
corrected = gamma_correct(duty_raw)
for led in leds:
led.duty(corrected)
print(f”Raw Duty: {duty_raw} → Corrected: {corrected}”)# Fade in and out loop
try:
while True:
# Fade in
for duty in range(0, MAX_DUTY + 1, STEP):
set_all_leds(duty)
time.sleep(DELAY)time.sleep(1) # Hold at full brightness
# Fade out
for duty in range(MAX_DUTY, -1, -STEP):
set_all_leds(duty)
time.sleep(DELAY)
time.sleep(1) # Hold off
except KeyboardInterrupt:
print(“\nInterrupted. Turning off LEDs…”)
set_all_leds(0)
The output
That’s all. So many LED projects and so much power to the microcontroller and to you too. Make them all and reach us back for more. When you make any of these, and publish on social media, don’t forget to tag us >> @MadeByHavi