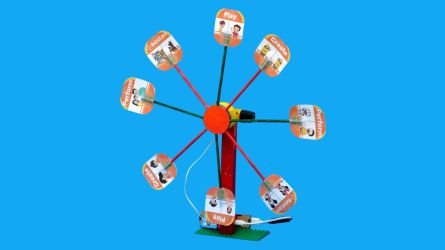
How to make a ferris wheel project model using motor and Havi Elements


Who remembers that thrilling feeling when coming down from the giant Ferris wheel? Yes, the Ferris wheel—one of the scariest yet most enjoyable rides in any amusement park!
In this blog post, we’ll show you how to make a Ferris wheel working model using skewer sticks and Havi’s robotic kits. Based on the basic motor principle, this DIY Ferris wheel can be an excellent choice for your next school science fair or exhibition project.
Let’s unveil the easiest way to build a DIY Ferris wheel project model with Havi Elements. Let’s get started!
Things you need to make DIY Ferris wheel
Elements:
Power – 1
Motor – 1
Accessories:
Wheel – 1
Power bank with USB Cable – 1
Geared motor – 1
Craft material
Bamboo skewer sticks(0.5 cm diameter, 36 cm length approx.) – 4
Water colors
Cardboard piece
Glue gun
Templates(Provided in print-ready downloadable format)
Double-sided tape
Blocks for support(Optional)
Craft to make seats(Optional)
Contact us to get the elements & accessories.
Making of DIY Ferris wheel
Step 1:
Cut the bamboo stick in two equal parts. The recommended stick dimension is 0.5cm diameter and 35/36 cm long. You can cut your skewer sticks as per the dimension of the sticks you have.
Make a total of 8 equal sticks.

Step 2:
Color the sticks as per your choice using water colors.

Step 3:
Download the print-ready templates for making seats of the Ferris wheel. Recommended to color print in A4 sticker papers.
Click the below button to download.

Step 4:
Peel off the sticker a little bit and affix the bamboo stick exactly at the center in the sticker. Your one seat of the ferris wheel is ready.

Similarly, do that for all 8.


Step 5:
Remove the wheel grip. We need only the yellow ring for the project but keep the grip safe. Need to cover the wheel back with grip after the project.

Step 6:
Cut a card-board piece in circular manner exactly of wheel size and stick it over the wheel.

Step 7:
Arrange the ready sticks over the card-board and with the help of glue gun, stick them on the card-board. Cover it with another paper to keep the structure more robust. (Elder supervision is needed for those kids who are using glue gun for the first time.)

Step 8:
Snap the circuit: Power + Motor. Connect the power bank with Power Element using the USB cable.

Step 9:
Make a stand using building blocks or any craft and fix the geared motor on it using double-sided tape.

Step 10:
Connect the geared motor with the motor element. Attach the wheel with the shaft of the geared motor. Turn the power element ON. Your DIY Ferris wheel model is ready.

How does it work?
Power element behaves as the power source/switch for the circuit. As soon as we start the power element, it passes the current to the motor element and the connected geared motor starts to spin. With the spin of the geared motor, the attached wheel also spins and the Ferris wheel model starts spinning.
Isn’t it the easiest way of making the ferris wheel project model? No wiring, no soldering, just a simple easy way with Havi’s robotics starter kit.
Using the same circuit, you can also make:
Carnival ride model
Simple robot
Newton’s disc
5 basic robots for beginners
